【cuda】c++使用cuda核函数对图像进行处理
环境安装win10+cuda11.0+vs2019安装教程CUDA】cudnn+CUDA10.0+VS2017+win10详细配置(永久配置)注意事项:先安装cuda,再安装vs2019(其实也没严格顺序)cuda函数的调用正如CUDA C所称,CUDA对C语言进行了很好的扩展,直接使用C语言可以非常简单方便的调用CUDA核函数。但是当想使用C++的类成员函数直接调用核函数是不可行的,第一,核函数
环境安装
- win10+cuda11.0+vs2019安装教程
- CUDA】cudnn+CUDA10.0+VS2017+win10详细配置(永久配置)
- 注意事项:先安装cuda,再安装vs2019(其实也没严格顺序)
cuda函数的调用
正如CUDA C所称,CUDA对C语言进行了很好的扩展,直接使用C语言可以非常简单方便的调用CUDA核函数。但是当想使用C++的类成员函数直接调用核函数是不可行的,
第一,核函数不能作为类的成员函数,
第二,C++的cpp文件和CUDA的cu文件分别经由g++和nvcc编译,当两种代码混合就会编译出错
from here
因而C++的类和CUDA结合使用需要进行一层封装
官网的例子,是将代码杂糅到一块了,旨在将请代码如何调用,而且文件后缀是.cu文件
官网的例子,代码如下
#include "cuda_runtime.h"
#include "device_launch_parameters.h"

#include <stdio.h>

cudaError_t addWithCuda(int *c, const int *a, const int *b, unsigned int size);

__global__ void addKernel(int *c, const int *a, const int *b)
{
    int i = threadIdx.x;
    c[i] = a[i] + b[i];
}

int main()
{
    const int arraySize = 5;
    const int a[arraySize] = { 1, 2, 3, 4, 5 };
    const int b[arraySize] = { 10, 20, 30, 40, 50 };
    int c[arraySize] = { 0 };

    // Add vectors in parallel.
    cudaError_t cudaStatus = addWithCuda(c, a, b, arraySize);
    if (cudaStatus != cudaSuccess) {
        fprintf(stderr, "addWithCuda failed!");
        return 1;
    }

    printf("{1,2,3,4,5} + {10,20,30,40,50} = {%d,%d,%d,%d,%d}\n",
        c[0], c[1], c[2], c[3], c[4]);

    // cudaDeviceReset must be called before exiting in order for profiling and
    // tracing tools such as Nsight and Visual Profiler to show complete traces.
    cudaStatus = cudaDeviceReset();
    if (cudaStatus != cudaSuccess) {
        fprintf(stderr, "cudaDeviceReset failed!");
        return 1;
    }

    return 0;
}

// Helper function for using CUDA to add vectors in parallel.
cudaError_t addWithCuda(int *c, const int *a, const int *b, unsigned int size)
{
    int *dev_a = 0;
    int *dev_b = 0;
    int *dev_c = 0;
    cudaError_t cudaStatus;

    // Choose which GPU to run on, change this on a multi-GPU system.
    cudaStatus = cudaSetDevice(0);
    if (cudaStatus != cudaSuccess) {
        fprintf(stderr, "cudaSetDevice failed!  Do you have a CUDA-capable GPU installed?");
        goto Error;
    }

    // Allocate GPU buffers for three vectors (two input, one output)    .
    cudaStatus = cudaMalloc((void**)&dev_c, size * sizeof(int));
    if (cudaStatus != cudaSuccess) {
        fprintf(stderr, "cudaMalloc failed!");
        goto Error;
    }

    cudaStatus = cudaMalloc((void**)&dev_a, size * sizeof(int));
    if (cudaStatus != cudaSuccess) {
        fprintf(stderr, "cudaMalloc failed!");
        goto Error;
    }

    cudaStatus = cudaMalloc((void**)&dev_b, size * sizeof(int));
    if (cudaStatus != cudaSuccess) {
        fprintf(stderr, "cudaMalloc failed!");
        goto Error;
    }

    // Copy input vectors from host memory to GPU buffers.
    cudaStatus = cudaMemcpy(dev_a, a, size * sizeof(int), cudaMemcpyHostToDevice);
    if (cudaStatus != cudaSuccess) {
        fprintf(stderr, "cudaMemcpy failed!");
        goto Error;
    }

    cudaStatus = cudaMemcpy(dev_b, b, size * sizeof(int), cudaMemcpyHostToDevice);
    if (cudaStatus != cudaSuccess) {
        fprintf(stderr, "cudaMemcpy failed!");
        goto Error;
    }

    // Launch a kernel on the GPU with one thread for each element.
    addKernel<<<1, size>>>(dev_c, dev_a, dev_b);

    // Check for any errors launching the kernel
    cudaStatus = cudaGetLastError();
    if (cudaStatus != cudaSuccess) {
        fprintf(stderr, "addKernel launch failed: %s\n", cudaGetErrorString(cudaStatus));
        goto Error;
    }

    // cudaDeviceSynchronize waits for the kernel to finish, and returns
    // any errors encountered during the launch.
    cudaStatus = cudaDeviceSynchronize();
    if (cudaStatus != cudaSuccess) {
        fprintf(stderr, "cudaDeviceSynchronize returned error code %d after launching addKernel!\n", cudaStatus);
        goto Error;
    }

    // Copy output vector from GPU buffer to host memory.
    cudaStatus = cudaMemcpy(c, dev_c, size * sizeof(int), cudaMemcpyDeviceToHost);
    if (cudaStatus != cudaSuccess) {
        fprintf(stderr, "cudaMemcpy failed!");
        goto Error;
    }

Error:
    cudaFree(dev_c);
    cudaFree(dev_a);
    cudaFree(dev_b);

    return cudaStatus;
}
使用上面博主的例子,调用顺序如下:多了一层封装就可以调用了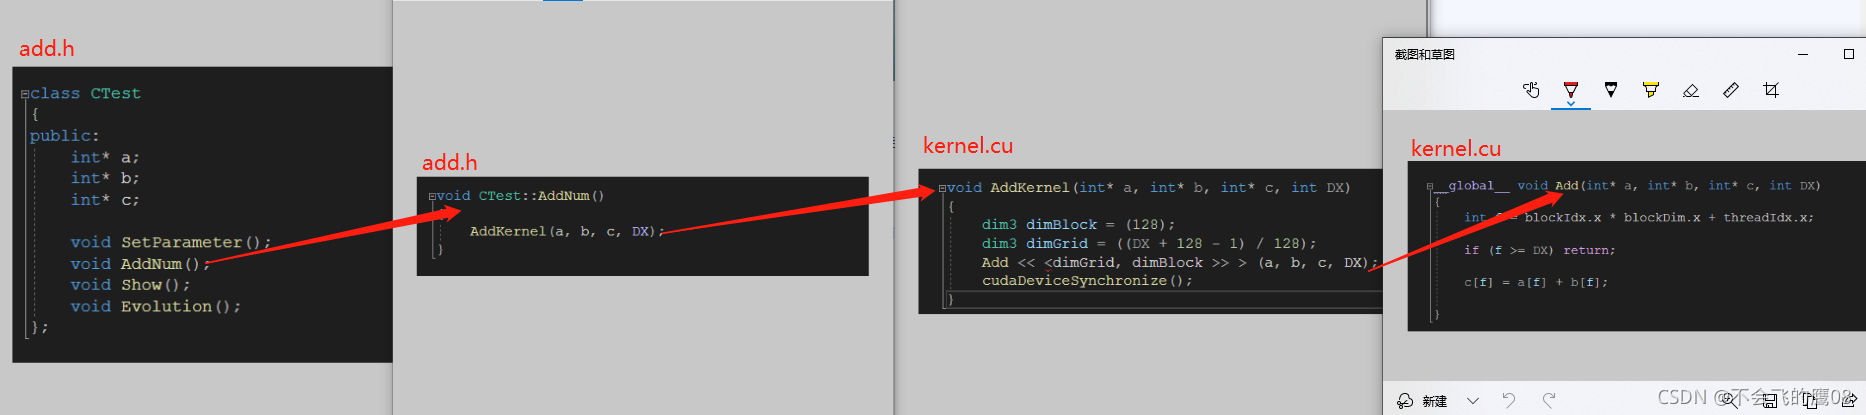
cuda执行过程
- 分配host内存,并进行数据初始化;
- 分配device内存,并从host将数据拷贝到device上;
- 调用CUDA的核函数在device上完成指定的运算;
- 将device上的运算结果拷贝到host上;
- 释放device和host上分配的内存
执行位置的标识符
由于GPU实际上是异构模型,所以需要区分host和device上的代码,在CUDA中是通过函数类型限定词开区别host和device上的函数,主要的三个函数类型限定词如下:
-
global:在device上执行,从host中调用(一些特定的GPU也可以从device上调用),返回类型必须是void,不支持可变参数参数,不能成为类成员函数。注意用__global__定义的kernel是异步的,这意味着host不会等待kernel执行完就执行下一步。
-
device:在device上执行,单仅可以从device中调用,不可以和__global__同时用。
-
host:在host上执行,仅可以从host上调用,一般省略不写,不可以和__global__同时用,但可和__device__,此时函数会在device和host都编译。
GPU 的信息
std::cout << "device info " << std::endl;
int dev = 0;
cudaDeviceProp devProp;
cudaGetDeviceProperties(&devProp, dev);
std::cout << "device id" << dev << ":" << devProp.name << std::endl;
std::cout << "sp num :" << devProp.multiProcessorCount << std::endl;
std::cout << "share mem " << devProp.sharedMemPerBlock / 1024.0 << "kb" << std::endl;
std::cout << "thread per block " << devProp.maxThreadsPerBlock  << std::endl;
std::cout << "thread per processer " << devProp.maxThreadsPerMultiProcessor << std::endl;
std::cout << "threads block per em " << devProp.maxThreadsPerMultiProcessor / 32 << std::endl;
result:
Grid->block->thread
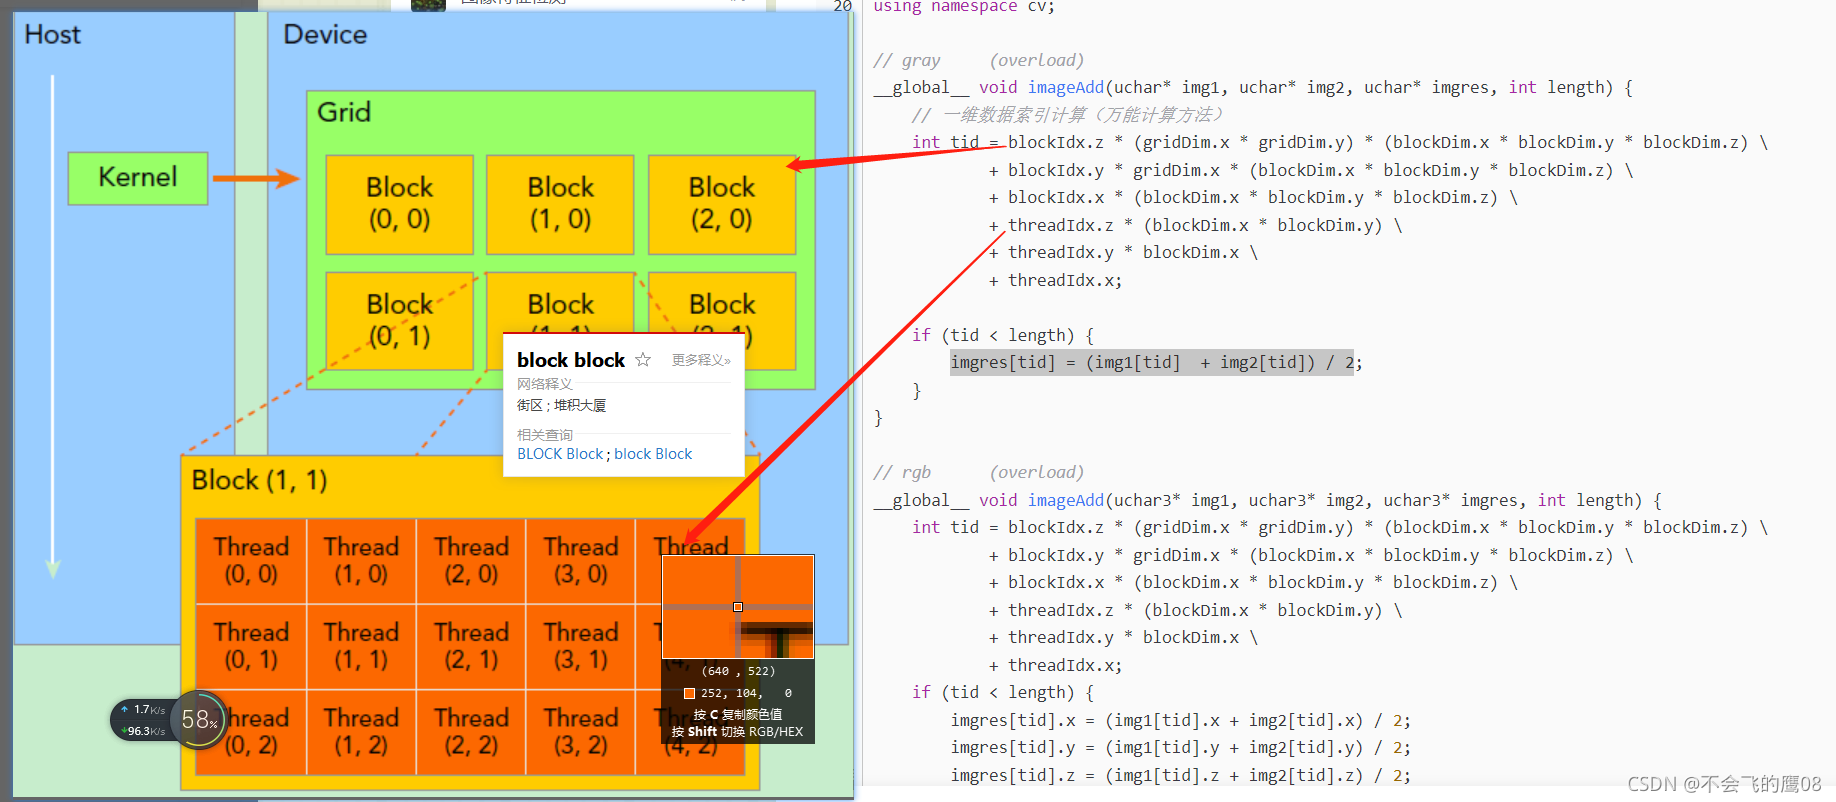
一个kernel所启动的所有线程称为一个网格(grid),同一个网格上的线程共享相同的全局内存空间,grid是线程结构的第一层次,而网格又可以分为很多线程块(block),一个线程块里面包含很多线程,这是第二个层次。线程两层组织结构如下图所示,
这是一个gird和block均为2-dim的线程组织。grid和block都是定义为dim3类型的变量,dim3可以看成是包含三个无符号整数(x,y,z)成员的结构体变量,在定义时,缺省值初始化为1。
因此grid和block可以灵活地定义为1-dim,2-dim以及3-dim结构,
对于图中结构(主要水平方向为x轴),定义的grid和block如下所示,kernel在调用时也必须通过执行配置<<<grid, block>>>来指定kernel所使用的线程数及结构。
dim3 grid(3, 2);
dim3 block(5, 3);
kernel_fun<<< grid, block >>>(prams...);
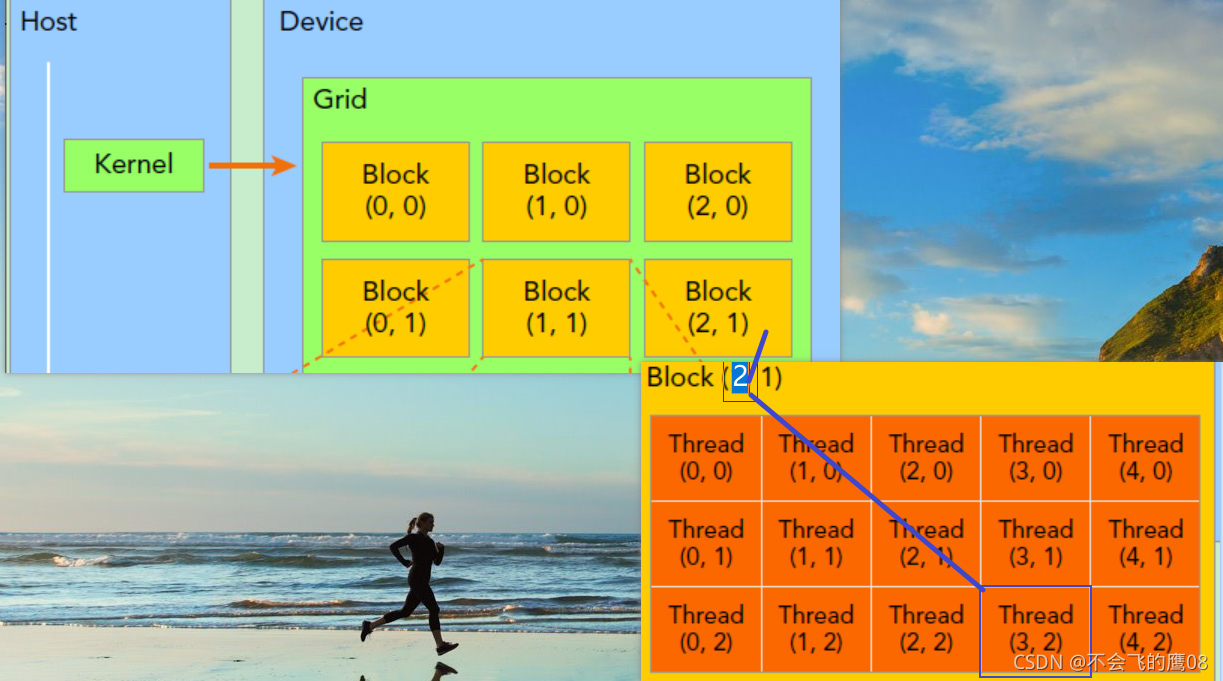
一个线程需要两个内置的坐标变量(blockIdx,threadIdx)来唯一标识,它们都是dim3类型变量,其中blockIdx指明线程所在grid中的位置,而threaIdx指明线程所在block中的位置,如图中的Thread (3,2)满足,如上图所示,对应的thread的位置的表示方法
threadIdx.x = 3
threadIdx.y = 2
blockIdx.x = 2
blockIdx.y = 1
如果一个线程所在的block DIm为 (Dx,Dy,)所在线程的id是(x,y),那么线程全局的id表示为(x+y*Dx)
如上图所示,
dim3 grid(3,2) // 两行三列,也就是每行有三个元素
dim3 block(5,3) // 五行三列,也就是每行有五个元素
kernel_fun<<< grid, block >>>(prams...);
block.dim的含义
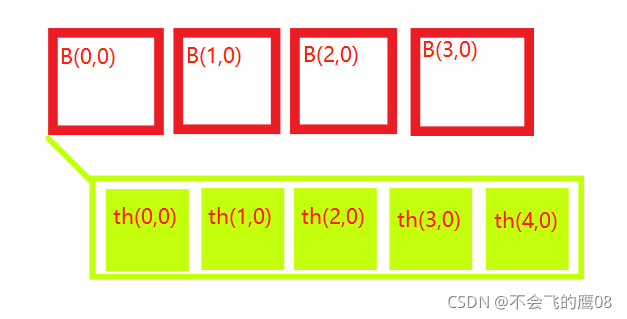
初始化上面的结构的话,可以使用命令
dim3 grid(4, 1); //一行四列,也就是每行四个(block)
dim3 block(5, 1); //一行五列,也就是每行五个thread

//1可以默认不写
dim3 grid(4); //一行四列,也就是每行四个元素
dim3 block(5); //一行五列,也就是每行五个元素
使用公式计算全局的索引
GlobalIdx_1D_1D = blockIdx.x * blockDim.x + threadIdx.x
借图说话
如果想要获取第2个block的第4个thread的id
idx = blockIdx.x * blockDim.x + threadIdx.x = (2-1)5+(4-1) = 8 (从0开始查,全局第八个元素)
idy = blockIdx.y * blockDim.y + threadIdx.y = 01+0 = 0 (从0开始查,第0个)
idx_gloable = idx + idy*nx,nx 是每个block的线程数量 ,在这里等于5
调用cuda函数实现图像相加
- 创建一张图像,填充为1,创建第二张图像,填充为2,在cuda运行相加算法,得出最后结果,拷贝到cpu
image_add.cu代码如下,在main函数中调用,代码改自这里
#include "image_add.cuh"

__global__ void imageAdd(float* img1, float* img2, float* imgres, int length)
{

    int tid = blockIdx.z * (gridDim.x * gridDim.y) * (blockDim.x * blockDim.y * blockDim.z)
        + blockIdx.y * gridDim.x * (blockDim.x * blockDim.y * blockDim.z)
        + blockIdx.x * (blockDim.x * blockDim.y * blockDim.z)
        + threadIdx.z * (blockDim.x * blockDim.y)
        + threadIdx.y * blockDim.x  + threadIdx.x;

    if (tid < length) {
        imgres[tid] = img1[tid] + img2[tid];
    }
}

void imageAdd_f(cv::Mat& img1_host, cv::Mat& img2_host, cv::Mat& imgres_host)
{
    int img_length = 25 * 25;
    float* img1_device;
    float* img2_device;
    float* img_result_device;

    int device_mem = img_length * sizeof(float);
    cudaMalloc((void**)&img1_device, device_mem);
    cudaMalloc((void**)&img2_device, device_mem);
    cudaMalloc((void**)&img_result_device, device_mem);

    // copy data from host to device,cudaMemcpy(void *dst, const void *src, size_t count, enum cudaMemcpyKind kind);
    cudaMemcpy(img1_device, img1_host.data, device_mem, cudaMemcpyHostToDevice);
    cudaMemcpy(img2_device, img2_host.data, device_mem, cudaMemcpyHostToDevice);

    int block_per_sm = 32;
    dim3 grid(img_length / (block_per_sm * block_per_sm+1)+1,);
    dim3 block(block_per_sm, block_per_sm);
    imageAdd << <grid, block >> > (img1_device, img2_device, img_result_device, img_length);

    cudaMemcpy(imgres_host.data, img_result_device, device_mem, cudaMemcpyDeviceToHost);
    std::cout << "add over" << std::endl;

    cudaFree(img1_device);
    cudaFree(img2_device);
    cudaFree(img_result_device);

}

欢迎来到FlagOS开发社区,这里是一个汇聚了AI开发者、数据科学家、机器学习爱好者以及业界专家的活力平台。我们致力于成为业内领先的Triton技术交流与应用分享的殿堂,为推动人工智能技术的普及与深化应用贡献力量。
更多推荐
 3
3 0
0- 0


 已为社区贡献1条内容

所有评论(0)